Router Setup Basics
Unbox the router and connect it
Take your new router out of its packaging and familiarize yourself with its various parts. You should see the router itself, a power adapter, and an Ethernet cable. (this looks much like a telephone wire, only with larger connectors on the end, see picture)

You will need the ethernet cable to complete the connections, so if you need one, now would be a good stopping point until you get one.
Connect the power cable to the router and plug it into an outlet.
Connect one end of the Ethernet cable to the back of your modem (the box that the internet service company provided to you) and the other end to the blue port on the back of your router.
If there is no blue port on the modem, look for one that is labeled “uplink” or just pick a port and plug in. Then push the power button on the back of your router to turn it on. (some do not have a power button and will start automatically) do not worry about plugging or unplugging cables while the router is turned on, you won’t damage it. For a wired connection (if your PC does not have a wireless card) you will need to connect another ethernet cable from the router (yellow port) to your computers ethernet port.
With a wired setup, your computer should now be online, as windows is set up by default to use the wired connection out of the box.
Do please read on for how to configure the SSID (network name) and Password for the wireless on your router, so that you can secure your network from intruders.
Router setup and connection
On your computer or mobile device connect to the network. Instructions for a Windows 11 PC are here. You are looking for something like “Name-5G” or “Name Of Network.” This will sometimes be listed on a sticker on the bottom or back of the router. Select the network and enter the password (if needed).
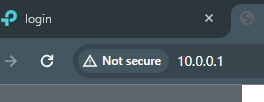
Open a web browser like edge, or chrome. Then we will enter what is called the “IP address” of the router in the address bar at the top of the browser window. (some brands of routers are providing user readable addresses for router administration access, it will look something like https://”brand”/admin or similar.)

usually:
192.168.1.1
192.168.0.1 or
10.0.0.1
